An MVC Example Using C++ and ncurses
I don’t love ncurses, but I don’t hate it either. It can be cumbersome to get it to work in a decent, foolproof way, but it does provide a framework for a two-dimensional interface without using graphics. In this article we will explore a way to use it MVC-syle. I obviously will be focusing more on the V part, but let’s start with a simple model.
The Model
For the purposes of our example, we will use a database mockup class:
struct personData {
	string fname,lname;
	int salary;
};

typedef map<int,personData> personCollection;

class SomeDB {

	private:

		personCollection persons={
			{1,{"Judah","Knight",1510}},
			{2,{"Drew","Guerra",590}},
			{3,{"Brooke","Arroyo",820}},
			{4,{"Dustin","Terry",1270}},
			{5,{"Isiah","Willis",1760}},
			{6,{"Julie","Mays",900}},
			{7,{"Mariyah","Holt",1240}},
			{8,{"Alexia","Payne",750}},
		};

	public:
		personCollection getPersons();
		void deletePerson(int);
		void updatePersonSalary(int,int);

};
Apparently the above implements a simple dataset of people along with their salaries. We want to be able to retrieve the whole dataset and, for our example, just to delete a person or change their salary. Those three methods are pretty simple to implement:
personCollection SomeDB::getPersons() { return persons; }
void SomeDB::deletePerson(int p) { persons.erase(p); }
void SomeDB::updatePersonSalary(int p,int s) { persons[p].salary=s; }
The View
In the world of objects, some of them need to be rendered. Every view object falls into that category. A Renderable object is one that must implement a render() method which will render it using a specific context:
template<class CtxT>
class Renderable {

	protected:

		CtxT *context;

		virtual void render()=0;

		~Renderable() { };

	public:

		Renderable(CtxT *ctx): context(ctx) { }

		using ctx_t=CtxT;

};
A View is a Renderable object that should be able to be shown and hidden by the application. We should also have a way to check if it is visible or not. The following implements those requirements in a straightforward way:
template<class CtxT>
class View: public Renderable<CtxT> {

	using Renderable<CtxT>::Renderable;

	private:
		bool shown=false;

	protected:
		bool showing() { return shown; }

	public:
		virtual void show() {
			shown=true;
			this->render();
		}

		virtual void hide() { shown=false; }

};
As far as ncurses goes, all user input is considered to originate from the keyboard. That is the only assumption we will make at this abstraction level, since we still know nothing about how each view would want to render itself. I want all ncurses views to recognize ^D as a general “exit” key, although the actual exit procedure should be handled by the controller. Moreover, the controller should be responsible for handling all other input. This means that we have to provide a way for the controller to bind functions to those two events:
class NCursesCtx {

	public:
		NCursesCtx();
		~NCursesCtx();

};

NCursesCtx::NCursesCtx() {
	initscr();
	cbreak();
	keypad(stdscr,TRUE);
	noecho();
	curs_set(0);
}

NCursesCtx::~NCursesCtx() { endwin(); }

class NCursesView: public View<NCursesCtx> {

	using View::View;

	protected:

		function<void(int)> onUnhandledKey;
		function<void()> onExit;

		virtual void handleKey(int);

	public:
		void setOnExit(function<void()>);
		void setOnUnhandledKey(function<void(int)>);

};

void NCursesView::handleKey(int k) {
	if("^D"==string(keyname(k))) onExit(); else onUnhandledKey(k);
}

void NCursesView::setOnExit(function<void()> f) { onExit=f; }
void NCursesView::setOnUnhandledKey(function<void(int)> f) { onUnhandledKey=f; }
Now let’s get even more specific. The above class could be used to implement any kind of view in ncurses: a button, a frame, a checkbox, a dialog or the whole screen. For our example we will be using the latter case, so let’s see what that would look like:
class NCursesScreen: public NCursesView {

	using NCursesView::NCursesView;

	protected:

		int width,height;

		virtual void produceContent()=0;
		void render() override;
		void handleKey(int) override;

	public:

		void show() override;
		void hide() override;

};

void NCursesScreen::render() {
	getmaxyx(stdscr,height,width);
	erase();
	produceContent();
	refresh();
}

void NCursesScreen::handleKey(int k) { if(KEY_RESIZE==k) render(); else NCursesView::handleKey(k); }

void NCursesScreen::show() {
	View::show();
	while(showing()) handleKey(getch());
}

void NCursesScreen::hide() {
	View::hide();
	clear();
}
Since we now know we’re dealing with stdscr, in order to hide() the view we have to also clear the screen. Although we still don’t know the view’s content, we do know that, in order to render() it, we have to first clear the screen and eventually refresh it. Descendants must implement a produceContent() and, in order to provide them with some context, we first collect the height and width of the screen.
When the view is shown, it enters a loop handling user input until it becomes hidden. Speaking of user input, I want to capture screen resizes and re-render the view, so that the content is adjusted to the new dimensions. Other than that, all input is forwarded to the parent’s handleKey().
I think we have enough groundwork to get us to the actual view of our example. In this step we must provide an implementation for produceContent() and override handleKey() for the view’s specific inputs. But first let’s focus on the communication with the controller. On the one hand there should be a way to notify it when the user wants to delete a person or change their salary, and on the other it must be able to provide the view with an updated personCollection:
class SomeView: public NCursesScreen {

	using NCursesScreen::NCursesScreen;

	private:

		personCollection list;
		vector<int> lines;
		int curLine=0;

	protected:

		function<void(int,int)> onUpdateSalary;
		function<void(int)> onDeletePerson;

	public:

		void setList(personCollection);
		void setOnUpdateSalary(function<void(int,int)>);
		void setOnDeletePerson(function<void(int)>);

};

void SomeView::setOnUpdateSalary(function<void(int,int)> f) { onUpdateSalary=f; }
void SomeView::setOnDeletePerson(function<void(int)> f) { onDeletePerson=f; }

void SomeView::setList(personCollection l) {
	list=l;
	lines.clear();
	for(auto &p:list) lines.push_back(p.first);
	curLine=min(curLine,(int)lines.size()-1);
}
So apart from the two new event handlers and their setter methods, setList() updates the internal personCollection with an up-to-date copy. We also need an internal vector to represent which visible line corresponds to which person id, and a curLine field that holds the currently selected line.
Ok, let’s now produce our content, which will be a list of persons that the user can iterate through, plus some instructions below it. We want to output everything somewhere around the center of the screen:
class SomeView: public NCursesScreen {

  	/* ... */

	protected:
		void produceContent() override;

  	/* ... */

};

void SomeView::produceContent() {

	int line=(height-14)/2,col=(width-50)/2;

	attron(A_BOLD);
	mvprintw(line++,col,"  First Name\tLast Name\tSalary  ");
	mvprintw(line++,col,"  ----------\t----------\t------  ");
	attroff(A_BOLD);

	attron(A_DIM);
	int i=0;
	for(auto &rec:list) {
		if(i==curLine) attron(A_REVERSE);
		personData p=list[rec.first];
		mvprintw(line+i++,col,"  %-10s\t%-10s\t%6d  ",p.fname.c_str(),p.lname.c_str(),p.salary);
		attroff(A_REVERSE);
	}
	attroff(A_DIM);

	line+=9;
	col+=3;
	mvprintw(line++,col,"[UP]/[DOWN] Select Person");
	mvprintw(line++,col,"[+]/[-] Increase/decrease Salary");
	mvprintw(line++,col,"[SHIFT][DEL] Delete");

	mvprintw(line++,col,"[q] Quit");

}
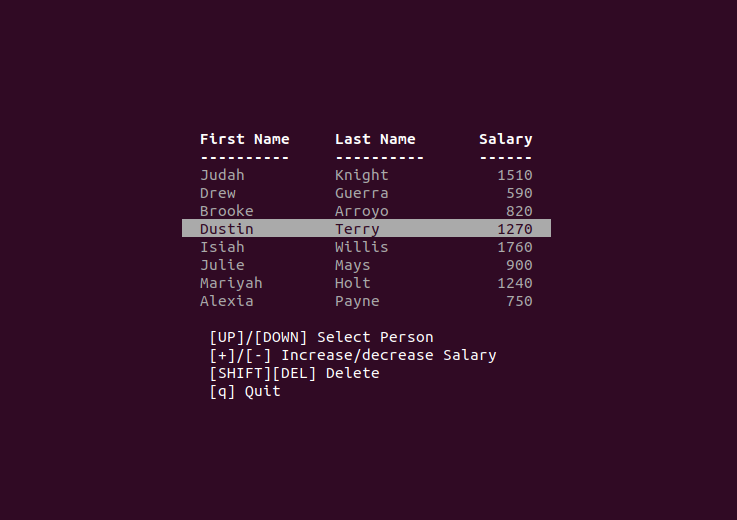
As we can see in the last four lines, the user can browse the list using the arrow keys, increase or decrease a person’s salary with [+]/[-], delete a person using [SHIFT][DEL] or quit by hitting [q]. The currently selected line in the list is highlighted by inverting the display colors. The result is something like this:
The last thing to cover is handleKey():
class SomeView: public NCursesScreen {

	/* ... */

	protected:
		void handleKey(int) override;

	/* ... */

};

void SomeView::handleKey(int k) {

	int pid=lines[curLine];
	personData p=list[pid];

	switch(k) {

		case 'q':
			hide();
			break;

		case KEY_UP:
			if(!lines.size()) break;
			if(curLine) curLine--;
			render();
			break;

		case KEY_DOWN:
			if(!lines.size()) break;
			if(curLine<lines.size()-1) curLine++;
			render();
			break;

		case '+':
			if(!lines.size()||(p.salary>99980)) break;
			onUpdateSalary(pid,p.salary+10);
			render();
			break;

		case '-':
			if(!lines.size()||(p.salary<10)) break;
			onUpdateSalary(pid,p.salary-10);
			render();
			break;

		case KEY_SDC:
			if(!lines.size()) break;
			onDeletePerson(pid);
			render();
			break;

		default: NCursesScreen::handleKey(k);

	}

}
Here we can see how our view:
- handles input regarding its own functionality (arrows and [q])
- signals the controller for model manipulation ([+], [-] and [SHIFT][DEL])
- forwards unhandled input up the inheritance hierarchy
The Controller
In an MVC application, while the model and the view are not aware of each other, the controller is the glue that binds them. Our controller must provide four event handlers for the view, and also an entry point for the application to call:
class SomeController {

	private:

  		NCursesCtx ctx;

		SomeDB data;
		SomeView *view;

		void viewExits();
		void viewDelegatesKey(int);
		void viewUpdatesSalary(int,int);
		void viewDeletesPerson(int);

	public:
		SomeController();
		void showView();

};
In the class definition above, we have four private methods which will handle the view’s signals, like so:
void SomeController::viewExits() { view->hide(); }
void SomeController::viewDelegatesKey(int k) { beep(); }

void SomeController::viewUpdatesSalary(int p,int s) {
	data.updatePersonSalary(p,s);
	view->setList(data.getPersons());
}

void SomeController::viewDeletesPerson(int p) {
	data.deletePerson(p);
	view->setList(data.getPersons());
}
When the view exits we simply hide() it, effectively terminating its internal input loop, while in the case of unhandled input we play a beep(). The other two methods perform the requested task at the data layer and update the view with the new list.
Other than that, the constructor creates the view and binds its signals with the event handlers, the destructor deletes it and showView() is the entry point, which simply initializes the view and shows it:
SomeController::SomeController() {
	view=new SomeView(&ctx);
	view->setOnExit(bind(&SomeController::viewExits,this));
	view->setOnUnhandledKey(bind(&SomeController::viewDelegatesKey,this,_1));
	view->setOnUpdateSalary(bind(&SomeController::viewUpdatesSalary,this,_1,_2));
	view->setOnDeletePerson(bind(&SomeController::viewDeletesPerson,this,_1));
}

SomeController::~SomeController() { delete view; }

void SomeController::showView() {
	view->setList(data.getPersons());
	view->show();
}
Finally, to wrap things up, in main() we would tell the controller to show the view:
int main() { SomeController().showView(); }
One Comment